Is it possible to go light without going AT? Maybe.
Once upon a time telemark gear was as light as it got; if you just wanted to move around in the mountains, that’s what you used. AT bindings were basically just downhill bindings mounted to a metal bar (and some still are). But Dynafit, with their tech-bindings, and the rando-racing circuit, with their competitive drive for weight savings, have tipped the scales so far in AT’s favour it’s hard to ignore.
Most of my friends who care about weight have all given up the tele turn and switched to rando gear (at least for their spring setup). And who can argue with them? For $400 you can buy Dynafit’s bare-bones tech binding (Speed Radical) that is burly enough to never catastrophically fail on you, free pivot, releasable, ski-crampon compatible, and ~700 grams for the pair. If you’re flush with cash the RC1 comes in at 132g.
Here I’m going to describe the two lightweight tele setups I’ve put together in my quest to go light without giving up the tele turn. Sometimes, even in spring, conditions are good and it just feels like such a shame to lock down the heels. I mean, skiing is supposed to ultimately be about fun… right?
While NTN looks like it might be coming along soon with the Meidjo binding, nobody makes light NTN boots. Everybody has seen the naked 3-pin bindings, and they work OK, but for me the pins rip out all too quickly. Hence my 2 setups:
Tele-tech
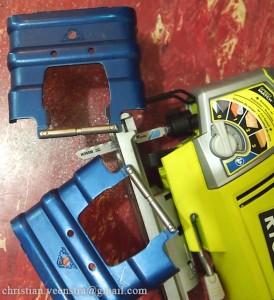
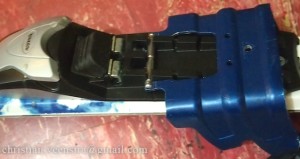
I’ve been skiing a pair of TTS bindings with an old pair of Scarpa F1 race boots for a while now. I use speed radical toe pieces for reliability, and machined my own cable blocks to leave enough room for B&D ski crampons. Unfortunately the TTS system has two options for heel wire size, and there is underlap between the sizes. The missing region is exactly my boot size, with the heel blocks mounted where I like them for front/rear pivot point. Fortunately, like many, I have a huge bin of unused binding parts from which I was able to piece together something that fit. I also modified the downhill-lock lever on the boots to have a more relaxed angle (I just drilled/tapped some new mounting holes and moved the existing lever). Even with the more relaxed angle in the boots if mounting these bindings again I think I would either use shorter heel blocks or toe shims.
The control is awesome – with the tech-toe there is no slop – and the free-pivot makes breaking trail basically effortless. This is my go-to setup if I want to travel fast and light, and think I might need to break trail or do some tricky skiing. I have them mounted on fishscale skis for good kick-and-glide. The lack of a duckbill on the F1s also makes them better at scrambling or kicking steps than regular tele boots.
2290g – F1 race boots (pair with liners)
1075g – quasi-custom TTS bingings (pair with all the fixings)
2425g – Fischer S-Bound 112 skis (pair, 169 cm)
I crossed the Pemberton Icecap in a day using this setup. But, if I had had it at the time, I probably would have used my other setup:
NNN-BC
Although the “BC” in NNN-BC does stand for “backcountry” many would consider this to be a cross-country binding. And, basically, it is just a beefy XC binding. I also considered skate boots/bindings (those come wicked light) but couldn’t find anything that looked like it might stand up, especially to hiking on logging roads. There are 2 competing (and incompatible) such beefy XC systems – the Rossi NNN-BC and Salomon X-Adventure. In the store I found that the X-adventure had more slop in the binding, and the boot soles were less torsionally-rigid. You can make up for a lot of deficiencies with good skiing technique, but (torsionally) floppy boot soles are not one of them. The X-Adventures were also heavier. NNN-BC it was. I picked the BCX10 boots, since (although fabric) I thought they looked like they might still offer some control.
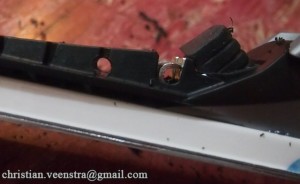
I modified the bindings by drilling out some ski-crampon mounting slots, and then enlarged the centre gap on some dynafit ski crampons to fit. At first it seemed kind of sketchy… but I’ve used them on quite a few steep icy sidehills now and they seem to hold up. Because the mount point is so far forward they work with and without the heel risers (I mounted some old G3 heels – thanks Jeff – so I could have heel risers).

Partway through the binding mod – first I drilled through the boot guide-channels (shown), then I cut a notch down to the hole.
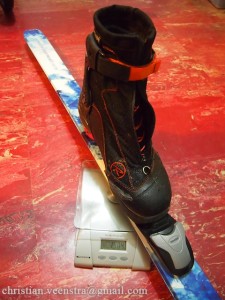
I also modified the boots by removing the factory power strap and sewing in a lighter one. Mostly this was because the factory power strap was mounted with some clunky metal hardware that attacked my ankles on long days. Another problem was blisters – they attacked my heel. Since there’s no liner to re-mold instead I tried to stretch them a bit with clamps and tennis balls, and also applied some Engo patches. The patches worked great, seriously reducing the friction, but the adhesive de-laminated from the back of the patch and they fell off after 1 trip. I emailed the manufacturer and they paid way more attention to me than might be justified given the cost of the patches – they said they had a bad round of manufacturing and sent me some new larger patches. These have also partially delaminated around the edges, but the patch is big enough that it still stays where it needs to be. I think it may be partially due to the liner in the boot being quite stretchy, and the patch not stretchy at all.
In the store I thought that I would be able to remove the little rubber toe-bumper on the bindings and achieve free-pivot glory. In the field, however, that spot quickly packs with ice so I don’t actually bother. Maybe I’ll mod them one day… I think there is potential. The rubber bumper doesn’t really provide much resistance – just enough to make skating easy… or, conversely, enough to cause tip dive if you are trying to break trail. The lack of an “uphill mode” (boots or bindings) does mean that, at transitions, I don’t actually do anything other than remove climbing skins and ski. Nice.
I have to say I’ve been pleasantly surprised with the skiing performance. I’ve done a number of trips on them now, including the East summit of Castle Towers, the Owl-Tenquille Traverse, the Semi-Alcoholic Traverse, and even a day at the resort. All of these involve some pretty real skiing, but I find that – when you are just trying to move quick – you end up just quickly side-slipping any difficult sections anyway. Only when things are good to you really try and ski – and then it’s nice to tele. Make sure you have a solid stance, though – these boots/bindings certainly don’t press the ball of your foot down for you. You’ll have to do that yourself.
I was also surprised at how good the grip on the soles was – I had my doubts since it wasn’t Vibram – but they work great scrambling/edging on rock. They also have a rigid enough sole that they work well for kicking steps – better than plastic duckbill tele boots, I would say. The metal bar for the binding interface has survived many toe-stubbings on rocks while hiking logging roads. Unfortunately I have not been able to find a pair of crampons that fit them firmly, due to the extra wide NNN-BC toe.
1690g – BC X10 NNN-BC boots (pair, with non-removable liners)
530g – NNN-BC “magnum” bindings (pair)
1645g – Voile WSP skis (pair, 165)
Not only did this setup come in at an on-par weight to AT rando-racing gear, it did this on the cheap (one might note that they are rando-racing skis, of course). The boots and bindings together, new, came in at $260 before tax on clearance. It should be noted that there also exists the BC X2 boots – basically just hiking boots – which are under 1400g for the pair. I’m thinking about it. These are now my primary fast-and-light skis, if I don’t think I’ll need to break trail or ski any difficult fall-you-die terrain. I try to avoid that sort of terrain anyway, so mostly it comes down to trail breaking.
Two complaints are the fact that the lace system needs to be re-tightened a lot (although that should be easy to mod, I suppose) and the lack of waterproofness. They are certainly not, well, plastic. A day of skiing in the slop and your feet will be soaked. I tried seam-sealing them, but it didn’t help much. Maybe I need to coat them in something… I wonder how much weight that would add…


